
The Anatomy of a Representative Oil Sample: Avoiding Common Field Pitfalls
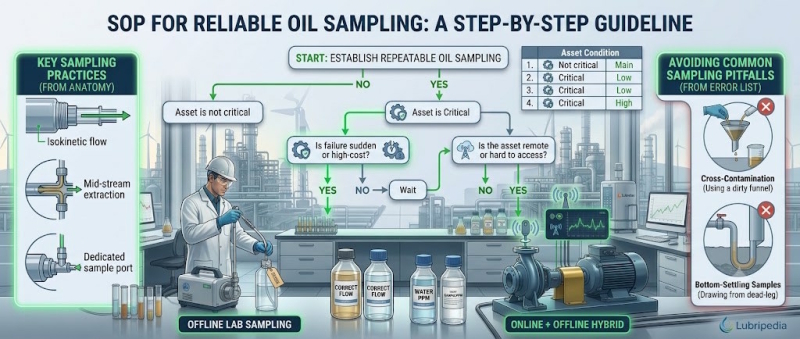
In any industrial proactive maintenance program, oil analysis is only as good as the sample sent to the lab.
A laboratory report filled with precise particle counts, wear metal values, and spectral data is useless—or worse, misleading—if the fluid sample was drawn incorrectly. Collecting a bad sample leads to false alarms, wasted labor, unnecessary oil drains, or unpredicted machine failure.
To achieve world-class Lubrication Reliability™, maintenance technicians must master the anatomy of a representative oil sample and eliminate common sampling pitfalls in the field.
1. What Defines a "Representative" Oil Sample?
A sample is considered representative only when the fluid drawn into the bottle perfectly reflects the operating conditions of the lubricant inside the active lubrication zone of the machine.
To be truly representative, a sample must meet three criteria:
- Dynamic Conditions: Taken while the machine is running at normal operating temperature and load, or immediately after shutdown (within 10–15 minutes).
- Active Flow Area: Extracted from a turbulent zone where fluid flows actively (e.g., return lines, mid-sump sample valves), rather than stagnant dead-legs or settling zones.
- Contamination-Free Extraction: Collected without introducing external airborne dust, moisture, or dirt from the sampling hardware itself.
2. The 4 Most Common Field Sampling Pitfalls (And How to Fix Them)
Pitfall #1: Sampling from Dead-Legs or Drain Plugs
- The Error: Opening a bottom drain plug or taking a sample from a long, stagnant pipe extension (dead-leg) without purging.
- Why It Fails: Bottom drains collect settled sludge, free water, and heavy wear debris accumulated over months. This results in an artificially high wear reading and an incorrect diagnosis.
The Solution: Install dedicated live-sampling valves (pitot tubes or inline sample ports) directly in the active fluid flow path. If sampling from a pipe valve, purge at least 4 to 10 times the volume of the dead-leg before filling the sample bottle.
Pitfall #2: Uncontrolled Ambient Contamination
- The Error: Opening clean sample bottles prematurely in dusty, dirty, or humid plant environments.
- Why It Fails: Unwrapping a bottle and letting it sit on a workbench exposes the inner surface to ambient dust. A single particle of airborne silica (dirt) can throw off an ISO 4406 particle count rating by several levels.
- The Solution: Keep sample bottles sealed in their protective bags until the exact moment of sampling. Use a specialized vacuum sampling pump (e.g., EZ-SAM) and fill the bottle to 75–80% capacity, leaving headspace for lab agitation, then cap it immediately.
Pitfall #3: Static Sump Drop-Tube Inconsistencies
- The Error: Inserting a plastic tube down a dipstick port or filler cap into a static reservoir without controlling insertion depth.
- Why It Fails: Pushing the tube too deep draws bottom sludge; leaving it too high samples top-layer oxidation and light fluid floating on surface foam.
- The Solution: Use rigid or tube-positioning tools to ensure the suction tube reaches the exact midpoint of the fluid level, well clear of side walls and the bottom sediment zone.
Pitfall #4: Cross-Contamination of Hardware
- The Error: Reusing vacuum sampling pump tubing or using dirty, non-certified fluid containers.
- Why It Fails: Residual fluid left in sampling tubes or non-clean containers transfers wear particles and cross-contaminates the new sample batch.
- The Solution: Always use fresh, single-use vacuum tubing for every sample point. Utilize Clean or Ultra-Clean certified sample bottles compliant with ISO 3722 standards.
3. Step-by-Step SOP for Reliable Oil Sampling

┌──────────────────────────────────────────────────────────┐ │ STEP 1: Prepare Equipment & Inspect Sampling Point │ │ • Verify machine is at normal operating temperature │ │ • Ensure clean bottle & fresh vacuum tube are ready │ └─────────────────────────────┬────────────────────────────┘ │ ▼ ┌──────────────────────────────────────────────────────────┐ │ STEP 2: Purge the Live Sampling Valve / Dead-Leg │ │ • Flush 4x to 10x the dead-leg volume into waste container│ └─────────────────────────────┬────────────────────────────┘ │ ▼ ┌──────────────────────────────────────────────────────────┐ │ STEP 3: Draw the Representative Sample │ │ • Connect sampling pump / vacuum tube │ │ • Fill bottle to 75%–80% capacity (leave air gap) │ └─────────────────────────────┬────────────────────────────┘ │ ▼ ┌──────────────────────────────────────────────────────────┐ │ STEP 4: Immediate Capping & Labeling │ │ • Cap immediately upon filling │ │ • Complete label: Asset ID, Hours, Date, Oil Type │ └──────────────────────────────────────────────────────────┘
4. Key Takeaways for Lubrication Reliability
- Sampling is the foundation: Without proper technique, laboratory oil analysis loses its predictive value.
- Standardize hardware: Equip critical gearboxes, hydraulic systems, and pumps with standardized sampling valves and clean access points.
- Train technicians: Establish clear Standard Operating Procedures (SOPs) across your plant floor to guarantee consistency, no matter who draws the sample.